Yes, to provide the best cleansing results.
Depending on the environment and usage frequency, under normal usage conditions, it is generally recommended to schedule a professional air conditioner cleaning service once every 1–2 years for home air conditioners.
Cleansing an air conditioner can improve indoor air quality, reduce bacterial growth, enhance cooling efficiency, and make the air conditioner more durable
To register your product for warranty, please send a message via WhatsApp to 6801 3089.
For other warranty or maintenance questions, please WhatsApp 6801 3099.
Please contact the related dealer/ retail shop for the official purchase invoice replacement.
Customer is required to present Product Warranty Card together with the official purchase invoice issued by the dealers of Hong Kong or Macau to our technician for verification when warranty service is required, otherwise repair service will be on chargeable basis.
Please contact the related sales company for the warranty card replacement.
Panasonic Appliances (except LED Lighting products, Ventilating Fan, Cassette Type/ Ceiling Type/ Duct Type/FS Multi/ FSV VRF Split Type Air Conditioner, Scanner, Cordless/Corded Phone, IP Camera), Vintec Wine Cabinet and Transtherm Wine Cabinet, please contact Shun Hing Electronic Trading Co., Ltd (Tel: 2733 3888) for further assistance.
Rasonic/ KDK/ Küppersbusch / Teka / Frostar / Doshisha / Koizumi appliances or Panasonic LED Lighting, Ventilating Fan、Cassette Type/Ceiling Type/ Duct Type/ FS Multi and FSV VRF Split Type Air Conditioner, please contact Shun Hing Electric Works & Engineereing Co., Ltd (Tel: 2861 2767) for further assistance.
Panasonic Scanner, Cordless/Corded Phone, IP Camera or Ziaino Air Treatment,please contact Shun Hing Technology Co., Ltd (Tel: 2313 0666) for further assistance.
Breville and Karcher appliances, please contact Shun Hing Innovation Concept Co., Ltd (Tel: 2313 0888) for further assistance.
Please refer to the details on the Product Warranty Card.
Customer is required to present Product Warranty Card together with the official purchase invoice issued by the dealers of Hong Kong or Macau to our technician for verification when warranty service is required, otherwise repair service will be on chargeable basis. All fees are non-refundable.
The video below explains where air conditioner odors usually come from and offers simple ways to get rid of them:
https://www.youtube.com/embed/18whBi_KohA
If the smell remains after cleaning and maintenance, please book a repair service online right away.
The video below explains what causes unusual noises from an air conditioner and what external factors may be involved:
https://www.youtube.com/embed/Uz2oHFwAkeM
If your air conditioner continues to make abnormal sounds, we recommend booking a repair service online without delay.
The video below explains what causes air conditioner water leaks: https://www.youtube.com/embed/tAGTJ-l0NK4
If your air conditioner continues to drip water, we recommend booking a repair service online right away."
When the air conditioner's fan is set to auto mode, it will either delay blowing air for 40 seconds or run intermittently. This is part of the unit's self-cleaning feature.
To reset the filter cleaning indicator light (for selected models only):
-
Reinstall the cleaned filter into the air conditioner.
-
Lightly press the 'Unit Reset' / 'AC RESET' button on the remote control, or lightly press the 'FILTER CLEAN' button on the control panel. You will hear a single beep, and the filter cleaning light on the air conditioner will turn off."
Users are advised to clean the air filter every month. In addition, it is recommended to schedule a professional air conditioner cleaning service once a year. Cleaning only the filter yourself cannot remove dust that has built up inside the unit. A professional cleaning service involves dismantling the unit and sending it to a cleaning centre for a thorough wash of all internal components. This not only improves indoor air quality, but also boosts the unit's performance and longevity, helping to lower both electricity bills and repair costs.
When arranging a cleaning service for a window-type air conditioner, you should also schedule a drain pan and drain hose cleaning at the same time. This is the only way to effectively prevent water leakage caused by blockages in the drain pan or hose.
Maintenance tip for window-type air conditioners: The cost of cleaning or replacing the drain pan and drain hose may not be included in the standard air conditioner cleaning service. Please confirm this with the service provider when booking."
When the air conditioner's temperature sensor detects that the room temperature is close to the desired setting, the unit temporarily stops blowing cold air. Once the sensor detects that the room temperature has risen above the set temperature, the air conditioner will resume blowing cold air
Your space may be particularly warm (for example, a rooftop, a hot machinery workshop, or a kitchen), or the room that needs cooling may be too large for your current unit – meaning the total cooling capacity required is greater than what your model can provide. To achieve your desired temperature, please consider installing an additional air conditioner or upgrading to a unit with a higher cooling capacity (larger horsepower).
If the outdoor unit cannot dissipate heat properly, cooling performance will be affected. This is usually because the installation location does not allow adequate heat dissipation. In this case, the customer should notify their installer to adjust the installation method or move the unit to a different location. Once the unit receives sufficient heat dissipation, its cooling capacity will improve.
Because a lot of dust has built up in your air conditioner, its cooling effect is now reduced. Please take advantage of our service center's professional cleaning service. Once cleaned, your air conditioner's cooling performance will improve noticeably.
After many years of use, although your air conditioner is still running, we have found that the refrigerant level has dropped and its cooling capacity has reduced. We kindly ask you to allow our service center to arrange for the unit to be sent back to our workshop for refrigerant recharging. We also recommend that you take advantage of our air conditioner cleaning service at the same time. This will ensure that after both services are completed, your air conditioner will be restored to normal cooling performance.
The new air conditioner comes with a certified energy label. It uses less electricity and lowers your bills compared to the old unit, which means its cooling output is slightly reduced. However, it still provides enough cooling to keep you comfortable – so please rest assured, the unit is operating normally.
Only available in Chinese.
The steam function cannot be used independently; it can be added to the Cotton, Mixed, Sheets, or Baby wash programs. For details, please refer to the user manual.
Noise during empty operation is normal. The machine's performance should be assessed based on its operation when clothes are loaded. When the machine runs empty, internal parts cause off-centre movement of the drum, resulting in vibration and noise. If the machine operates smoothly without unusual noise, it is working normally.
To request a replacement warranty certificate for your Panasonic bathroom heater, please contact Shun Hing Electronic Trading Co., Ltd. at 2733 3888.
For a replacement warranty certificate for a Rasonic or KDK bathroom heater, please contact Shun Hing Electric Works and Engineering Co., Ltd. at 2861 2767.
Important note: To process your warranty card reissuance, you will need to provide proof of purchase. Please prepare a valid receipt from the store where you bought the product. If you have also lost the receipt, you will need to contact that store directly.
The remote control needs to be paired before use. Within 1 minute of powering on the bathroom heater, press and hold the 'HEAT' and 'VENT.' buttons on the remote control simultaneously for 3 seconds. When pairing is successful, three beeps will sound.
Because the thermo ventilator requires installation and different customers have different needs, a power cord is not provided. Customers must purchase it themselves.
Depending on your needs, we recommend cleansing the thermo ventilator annually
Press and hold the mode button on the unit for 3 seconds. When you hear a beep, the filter cleaning indicator light will turn off and the accumulated operating time will reset."
Please clean the filter using a vacuum cleaner.
Once you select a function on the thermo ventilator, it will remember that same function the next time you use it.
To clean the filter, use a vacuum cleaner. After cleaning, turn the power off, then turn it back on. Press and hold the MODE button on the unit for 5 seconds. You will hear three beeps – this means the filter light has been reset/cancelled.
It is recommended to clean the Teka food waste disposer at least once a month to remove residue and grease. Turn on the cold water tap, start the disposer, and put in a few ice cubes. The hardness of the ice cubes helps remove food residue from the grinding hammers and grinding chamber. Lemon or orange peels can help remove grease and leave a fresh scent. It is recommended to use a 10:1 ratio of ice cubes to lemon or orange peels for grinding as a cleaning method. Alternatively, fill the sink halfway with warm water, mix in 1/4 cup of baking soda, and use this to clean the food residue inside the grinding chamber of the disposer.
Under normal use of the Teka food waste disposer, food waste is ground into fine particles and flushed away with running cold water through pipes that are in good condition. When using the Teka food waste disposer, you should keep the cold water running for about 15 seconds and regularly maintain the pipes to keep them clear. Additionally, the centrifugal force generated by the high-speed rotation of the disposer helps effectively clear the drain pipe, reducing the risk of blockages.
First, turn off the power to the Teka food waste disposer. Then, use long chopsticks or long-handled tongs to remove the fallen object. Never put your hands or fingers into the food waste disposer to retrieve the item.
Just 3 simple steps, the Teka food waste disposer can cleanly and easily handle daily food waste immediately.
-
Turn on the cold water tap.
-
Press the pneumatic switch to start the food waste disposer.
-
Put food waste into the disposer.
(Do not put a large amount of food waste into the Teka food waste disposer at once, nor fill it up before starting the disposer. You should add food waste gradually.)
The Teka food waste disposer is installed at the drain outlet of the sink and features a blade-free design. It uses specially designed grinding hammers that spin at high speed to generate centrifugal force, pressing food waste against the grinding ring to grind it into fine particles, which are then flushed away with running cold water. The food waste disposer effectively reduces the amount of food waste sent to landfills. When washing dishes, you can also use the disposer at the same time, allowing the flowing water to carry away the ground food particles – achieving water savings.
Please contact the responsible team via WhatsApp at 5401 1278.
Installation of a food waste disposer requires an initial site visit by a technician to assess the location, check suitability, and identify any additional work. After the customer accepts the quote, installation can be scheduled.
It's possible that the food waste disposer has tripped the Reset button.
Please follow steps below:
- Connect your Android device (smartphone, etc.) to the same network as your Panasonic TV.
- On your device (smartphone, etc.), launch a Chromecast-enabled app (e.g., Google Home) and select your TV as the connected device.
- Seclect “Google Home”app on the Android samrtphone
- Select “All devices”
- Select Panasonic Google TV code name
- Select “Stop casting”
- Select “Cast my screen”
- Select “Cast screen”
-
Finally, choose to display “A single app” or the “Entire app”, and then select Allow.
- You can be casting the images from your Android device (smartphone, etc.) onto the Panasonic Google TV for viewing.
|
1. |
Turn on the TV. |
|
2. |
Press [Menu] button on remote control unit. |
|
3. |
Press [▲ / ▼] button to select [Setup], then press [OK] button. |
|
4. |
Press [▲ / ▼] button to select [Digital TV Tuning Menu], then press [OK] button. |
|
5. |
Press [▲ / ▼] button to select [Auto Tuning], then select [Start Auto Tuning] and press [OK] button. |
|
6. |
Auto Tuning is now complete and the TV is ready for viewing. |
Panasonic TV H400 Series Channel Setting:
Panasonic TV GX600 Series Channel Setting:
Panasonic TV HX700/800/900/HZ1000 Series Channel Setting:
|
1. |
Turn on the TV. |
|
2. |
Press [Menu] button on remote control unit |
|
3. |
Press [◄ / ►] button to select [Setting ], then press [OK] button. |
|
4. |
Press [▼ / ▲] button to select [Channel], then press [OK] button. |
|
5. |
Press [▼ / ▲] button to select [Channel], then press [OK] button |
|
6. |
Press [▼ / ▲] button to select [Channel Scan], then press [OK] button. |
|
7. |
Auto Tuning is now complete and the TV is ready for viewing. |
|
1. |
Turn on the TV. |
|
2. |
At the Antenna mode [Digital TV] mode, |
|
3. |
Press [Menu] button on remote control unit. |
|
4. |
Press [◄ / ►] button to select [All Settings] , then press [OK] button to enter the Setting page of TV |
|
5. |
Press [▼ / ▲] button to select [Channels & Inputs], then press [OK] button. |
|
6. |
Press [▼ / ▲] button to select [Channels], then press [OK] button. |
|
7. |
Press [▼ / ▲] button to select [Antenna], then press [OK] button. |
|
8. |
Press [▼ / ▲] button to select [Auto Scan], then press [OK] button. |
|
9. |
Auto Tuning is now complete and the TV is ready for viewing. |
|
1. |
Turn on the TV. |
|
2. |
Press [Menu] button on remote control unit. |
|
3. |
Press [▼ / ▲] button to select [Channels Setting] , then press the [OK] button. |
|
4. |
Press [▼ / ▲] button to select [Channels Scan] , then press the [OK] button. |
|
5. |
Press [▼ / ▲] button to select [Auto Scan] , then press the [OK] button. |
|
6. |
Auto Tuning is now complete and the TV is ready for viewing. |
- Turn-on the TV.
- Press MENU and ◀▶ buttons to select the CHANNEL.
- Press ▲▼ button to select the items.
- Press ENTER or ▶ button to enter the submenu.
- Press ▲▼ buttons to select Auto Tuning. Press ENTER button to enter Auto Tuning, the TV will search channels automatically.
- Turn-on the TV.
- Press (Menu) button on remote control unit.
- Press ( < / >) button to select (Channel) then press (OK) button.
- Press ( Ù / Ú ) button to select (Auto Search), then press (OK) button.
- Auto Search complete.
- Turn-on the TV.
- Press (Menu) button on remote control unit.
- Press ( Ù / Ú ) button to select (Setup), then press (OK) button.
- Press ( Ù / Ú ) button to select (Digital TV Tuning Menu), then press (OK) button.
- Press ( Ù / Ú ) button to select (Auto Tuning), then select (Start Auto Tuning) and press (OK) button.
- Auto Tuning is now complete and the TV is ready for viewing.
When you're not cooking, press and hold the key button (child lock) for several seconds – the unit will lock. When you want to cook, press and hold the same button again for several seconds to unlock. (Some models may vary.)
Please contact 24065666
In the current design, the power button flashes when the hob is in standby mode. Note: This applies only to Rasonic induction cookers.
Only available in Chinese.
Only available in Chinese.
Only available in Chinese.
Only available in Chinese.
Only available in Chinese.
Only available in Chinese.
Only available in Chinese.
Only available in Chinese.
Only available in Chinese.
Only available in Chinese.
Only available in Chinese.
Only available in Chinese.
Only available in Chinese.
Turn the Main Power Switch on the Back and the Power Switch on the Left Side of the machine to the OFF position, then back ON again. If the error code does not clear, Please click HERE
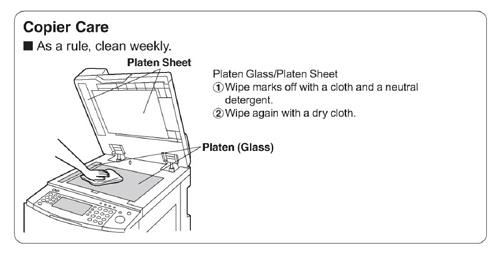
Clean the Platen Glass or Sheet.
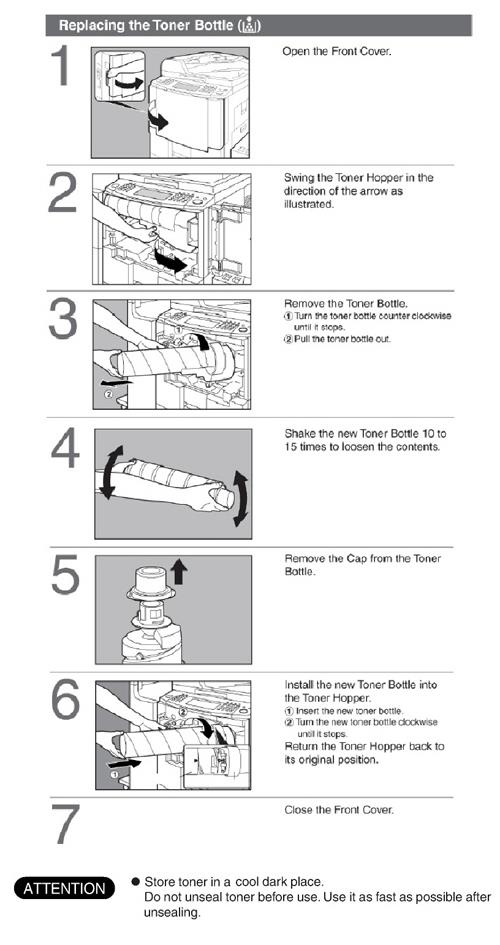
Replace the Toner Bottle.
|
Perform actions in accordance with each message. User Error Codes (U Code)
If the measures outliend above do not solve the problem, Please click HERE. |
|||||||||||||||||||||||||||||||||||||||||||||||
Disconnect the unit from the telephone line and connect the line to a known working telephone. If the working telephone operates properly, contact our service personnel to have the unit repaired. If the working telephone does not operate properly, contact your telephone company.
- The other party sent a faint document. Ask them to send a clearer copy of the document.
- Some paper has instructions recommending which side to print on. Try turning the paper over.
- You may have used paper with a cotton and/or fibre content that is over 20%, such as letterhead or resume paper.
- The remaining toner is low. Replace the toner cartridge.
- We recommend you replace the drum unit every third time you replace the toner cartridge. To check the drum life and quality.
- The toner save mode of feature #79 is on.

- The power cord or telephone line cord is not connected. Check the connections.
- If you used a splitter to connect the unit, remove the splitter and connect the unit to the wall jack directly. If the unit operates property, check the splitter.
- Connect the handset cord and the telephone line cord, then the power cord.
- When the power is turned on for the first time, the unit will print some basic information.
- The recording paper is not installed or the unit has run out of paper. Install paper and press "SET" to clear the message.
- The recording paper is not fed into the unit properly. Reinstall paper and press "SET" to clear the message.
- The recording paper has jammed near the recording paper entrance. Clear the
jammed paper and press "SET" to clear the message. Do not install folded or heavily curled paper.
- FAX ONLY mode is set. Tell the other party the number is only used for faxes.
- Change to TAD/FAX mode, TEL mode or TEL/FAX mode.
- If you use a distinctive ring service, turn AUTO ANSWER off so that the fax machine is in TEL mode.
- If you use a distinctive ring service, make sure you have set the same ring pattern assigned by the telephone company.
Only available in Chinese.
Only available in Chinese.
Only available in Chinese.
Only available in Chinese.
Only available in Chinese.
Only available in Chinese.
Only available in Chinese.
Only available in Chinese.
Only available in Chinese.
Only available in Chinese.
Only available in Chinese.
Only available in Chinese.
Aneroid battery (Dry battery) can be classified into Carbon Zinc battery, Alkaline battery and Nikckel Hydrogen battery.
Carbon Zinc battery is recommended for devices with low power consumption and non-long-term use (usually takes a long time to replace battery). For example, remote control, clock, radio and other low power devices.
Alkaline battery is recommended for devices with large power consumption and long term use (replace battery more often). For example, electric shaver, wireless mouse and remote control toys, etc.
Nikckel Hydrogen battery is recommended for “Heavy Continuous Drain” and frequently used devices (more environmentally friendly and rechargeable). For example, digital camera, external flashes, and remote control toys, etc.
To avoid leakage of battery. It is recommended to remove battery if the it is not use for a long time.
Only available in Chinese.
Only available in Chinese.
Only available in Chinese.
Only available in Chinese.
Only available in Chinese.
When you print with very low duty (less than 5%) and the toner page count gets to its life end (3,000 pages/Starter Toner, 6,000 pages/Option Toner), the printer stops printing and shows "Toner Empty" error even though the toner low is not detected by toner empty sensor. (refer to 5-1 Toner Empty Control Method) In this case " Toner Empty" error cannot be cleared by just replacing with new toner cartridge because the printer is not detecting low toner by toner empty sensor. To clear the error please install the drum unit only without the toner cartridge once, then install the new toner cartridge. This is mentioned in the Supplement that comes with the Option Toner Cartridge.
Only available in Chinese.
Only available in Chinese.
Only available in Chinese.
Only available in Chinese.
Having paper dust collect on or near the CCD or CIS can cause a line to appear on the digitized image. To remove this line, you will need to clean the rollers and the lens. Also, using compressed air will blow away any loose particulars such as paper shavings or paper dust.
Dirty rollers may cause document double feeding; your scanner needs routine maintenance. Regular cleaning and maintenance of your scanner will protect your investment, maximize scanner performance, and provide you with the best insurance against costly downtime. Please refer to your operation manual for instructions on cleaning your scanner.
To ensure optimal scanning performance, the paper feed rollers should be cleaned when 20,000 sheets or more are fed into the unit. In an environment where NCR paper is used, it is recommended that the paper feed rollers are cleaned on a daily basis. NCR paper contains chemicals that cause rollers to deteriorate at an accelerated rate, requiring roller replacement much sooner than scheduled. Daily cleaning of the paper feed rollers with isopropyl alcohol will help to prolong the life of the rollers in this harsh environment.
Only available in Chinese.
Only available in Chinese.
Only available in Chinese.
Only available in Chinese.
Only available in Chinese.